Nginx Proxy Manager is a web-based tool designed to simplify the setup and management of reverse proxies. It provides an easy interface to configure SSL certificates, manage multiple domains, and route traffic to local services. I will be referring to it as "NPM".
But why use something like this? It has many advantages like needing only one public IP address for multiple services on multiple domains, and only requiring one open port on the network instead of multiple ports for all your services.
Installing & Running NPM
This method is tested on Debian 12.
-
Install Docker and Docker-Compose
The easiest way to host an instance of NPM is using docker-compose. You need Docker and Docker-Compose installed on your server.
$ sudo apt install docker.io docker-compose -y
-
Create the docker-compose.yml file
Once that is done, create a file called
docker-compose.ymland put the following content in it:nginx-proxy-manager: image: jc21/nginx-proxy-manager:latest container_name: nginx-proxy-manager environment: DB_SQLITE_FILE: "/data/database.sqlite" volumes: - ./nginx-proxy-manager/config:/config - ./nginx-proxy-manager/data:/data - ./nginx-proxy-manager/letsencrypt:/etc/letsencrypt ports: - "81:81" # NPM webUI - "443:443" # HTTPS for NPM - "80:80" # HTTP for NPM restart: unless-stopped -
Start NPM
Now you can start NPM with one of these two commands:
# To run in current shell: $ sudo docker-compose up # To run it in the background: $ sudo docker-compose up -d -
First Login
Access the webUI of NPM in your browser using
http://IP_ADDRESS:81.These are the default login credentials:
Email:    [email protected]
Password: changeme
Basic Usage of NPM
In this example we will use one root domain and one subdomain.
- Root domain: bytesofprogress.net
- Subdomain: subdomain.bytesofprogress.net
-
Set Up DNS Records
The first step is to point your DNS A-Record or AAAA-Record to the public IP address of your NPM instance. In this example, Cloudflare DNS is being used.
-
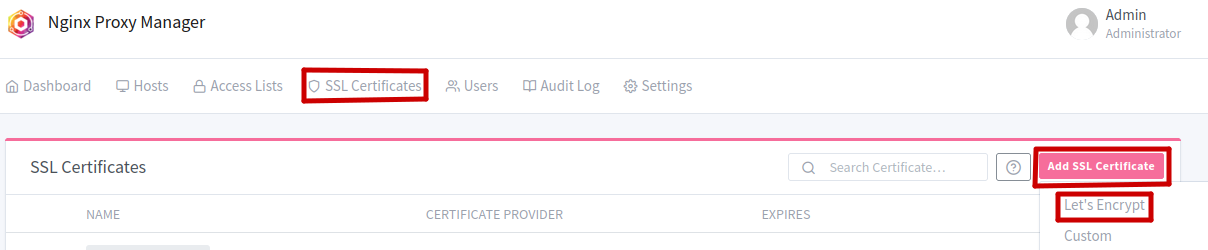
Issue an SSL Certificate
Then, we want to issue an SSL certificate:
For a wildcard certificate (which includes subdomains), type
*.example.com. Then enable "Use DNS challenge" and choose Cloudflare as the DNS provider. Paste your Cloudflare API Token.You can obtain your API-Token by logging into the Cloudflare Dashboard. From there, navigate to your Profile → API Tokens. Then click on "Create Token" and choose the template "Edit Zone DNS". Select the zone of your domain.
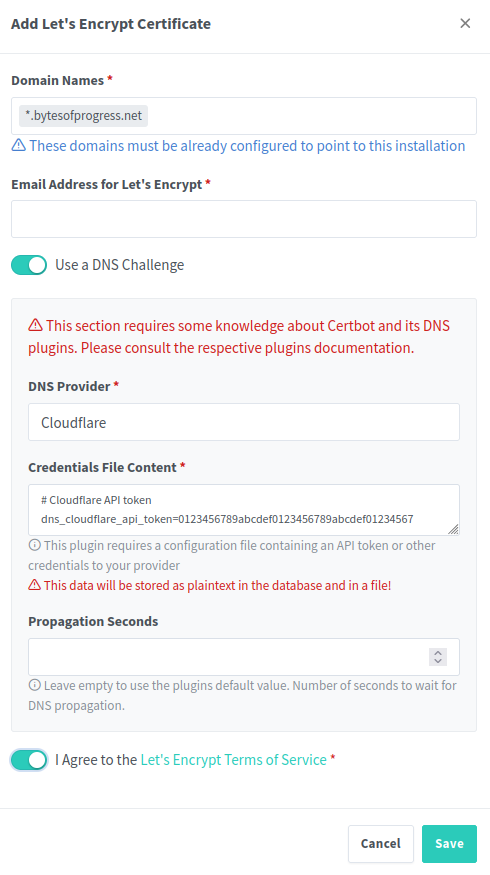
Now, click on "Save". The process can take up to a few minutes.
-
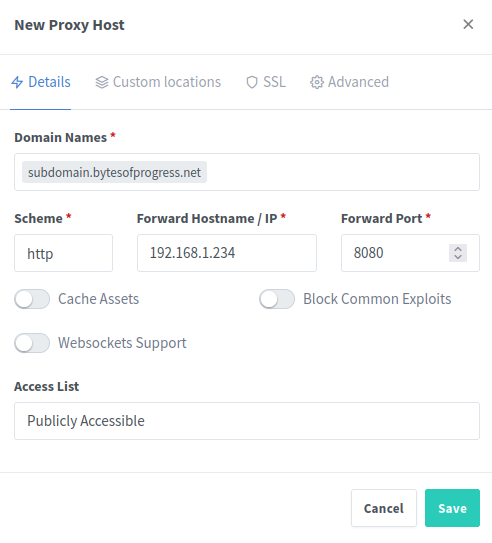
Create a Proxy Host
You can now create your first proxy host: